Marcella Hazan and the Beautiful Simplicity of Italian Cooking

This post is inspired by and in memory of the mother of Italian Cooking in the United States, Marcella Hazan. Marcella Hazan passed away at the age of 89 last Sunday and is the Julia Child of Italian cooking, she fundamentally changed how Americans cooked Italian food. She taught technique and simplicity in her cookbooks. Her tomato sauce was stunningly simple with only four ingredients, canned tomatoes, butter, salt, and one onion cut in half; that’s it, no basil, no garlic, no cheese. It is incredible, fresh, and uncomplicated.

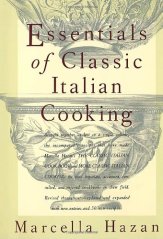
Marcella's classic 1992 cookbook Essentials of Classic Italian Cooking

Marcella’s classic 1992 cookbook Essentials of Classic Italian Cooking

Thumbing through her cookbooks you will find recipes with hardly ever more than ten ingredients and usually less than five. Reading her recipes and her insistence on technique it is easy to see what she did before her career of cookbook author, she held a doctorate in natural sciences and biology in Italy. Marcella embodied the true spirit of Italian cooking, a respect for ingredients and the ability to transform simple ingredients into incredible food. She was like no other and her voice will live long in American culinary history.

Flour & Eggs

Since the topic of this post is simplicity, what if I gave you a recipe that had only two ingredients that I would almost guarantee you have right now. Ready?! Flour + Eggs = Fresh Pasta Dough. That’s it, no need for water, yeast, oil, salt. Fresh pasta is softer and more delicate than dried pasta and works well for less hearty sauces as well as stuffed pastas like ravioli and tortellini. While this is a simple recipe, it is time-consuming and better as a weekend project. The great thing about fresh pasta is you can make a lot and freeze the rest. You can roll out pasta by hand with a rolling pin but things are much easier if you have a pasta roller, either manual or an attachment to a stand mixer.  This is one of those recipes that is all about ratios and is very easy to scale up or down.

Fresh Pasta Dough

4 Servings (Roughly One Pound)

Ingredients

  • 2 cups of flour (all-purpose is perfectly fine here)
  • 4 eggs (farm fresh eggs are the best here since you are using them raw)

1. Create a mound of flour in a large bowl, hollowing out a well.

2. Dump the eggs into the well and using a fork, slowly combine a little bit of the flour into the eggs.

3. Slowly mix the rest of the flour into the eggs. The dough will look like a shaggy mess.

4. Flour either a large cutting board or countertop and dump the dough onto the board/counter.

5. Knead the dough for about a minute until it comes to together. Gather it into a ball and begin to knead it with the heel of your hand, pressing and folding. Rotate the dough ball 90 degrees, and knead. Continue kneading -> folding -> rotating for about 10 minutes. The dough will eventually come together into a smooth and velvety ball.

6. Wrap the dough in plastic wrap and let rest for about 30 minutes.

7. Cut the dough into 4 pieces and roll out according to the directions of your pasta roller, or with a rolling pin.

The dough can be into strips for noodles, circles or squares for ravioli, or whole sheets for lasagna. The great thing about fresh pasta is that it cooks really quick. 3 to 5 minutes in boiling water is all it takes.

I used my pasta to make butternut squash ravioli.

My ravioli cutter

Perfect little ravioli circles ready for stuffing.

Deconstructed butternut squash ravioli with brown butter sage and tomato sauce


Never Buy Brownie Mix Again

In my experience, brownies hold an amazing power over people. Bring a plate of brownies to work or a party and watch them disappear. A boxed mix provides perfectly delicious brownies and are great when wanting to satisfy a brownie craving , but they can be pricey and include a long list of unfamiliar ingredients, something has to keep those mixes fresh for 9 – 12 months on the shelf! On the flip side, many homemade recipes are time-consuming and call for melting large amounts chocolate which while delicious, isn’t very economical or quick.

Not an ounce of melted chocolate!

What if I told you that you could make brownies at home in less than 45 minutes that are rich, moist, fudgy and of course that beautiful shiny cracked top; without having to chop and melt chocolate. Believe it or not, all of the chocolate from this recipe comes from the old pantry standby of cocoa powder.

Cocoa Powder Brownies (As Inspired by Smitten Kitchen)

16 – 25 brownies, depending on how large you cut them

Ingredients

  • 10 tablespoons unsalted butter (1 1/4 sticks butter)
  • 1 1/4 cup granulated sugar
  • 3/4 cup and 2 tablespoons cocoa powder
  • 1/4 teaspoon salt (I use kosher salt)
  • 1 teaspoon vanilla extract (“splurge” on the real stuff, Costco has a large bottle for less than $5.00)
  • 2 large eggs, keep cold until the last minute
  • 1/2 cup all-purpose flour
  • 1/2 cup of chocolate chips (optional)
  1. Preheat oven to 325 F and reposition your over rack to the lower third of your oven. Line bottom and sides of 8 x 8 baking pan with foil or parchment paper, leaving some overhang. Make sure the foil or parchment is pressed tight against the pan.
  2. Combine butter, sugar, cocoa powder and salt in a medium heatproof bowl, placing the bowl in a skillet of barely simmering water. Stir occasionally as the butter melts, after 7-10 minutes the butter should be melted. Stir until mixture is smooth and hot. Don’t worry if the mixture looks a bit gritty, it will smooth out in the next step.
  3. After the cocoa mix has cooled a bit, yet still warm, add the vanilla and stir. Add in the eggs, one at a time, stirring well after each one. Once the batter is looks thick and shiny, add the flour and stir making sure the flour is well incorporated and not visible anymore.
  4. Beat the mixture 40 times with a spoon or spatula, stirring in the chocolate chips if using. Spread the batter evenly into the lined pan.
  5. Bake for 30 to 35 minutes, checking after 25 minutes, until a toothpick poked in the center comes out slightly damp with batter. Let cool completely on a rack, then carefully pull off the foil or parchment. Be patient! 🙂 Cut and serve!

The cocoa mix melted and hot, ready to be cooled for eggs and flour,

Batter all thick and shiny after adding the eggs.

For The Love of Garlic

“This dish has too much garlic.”

That is a phrase never uttered in my house. Maybe it is because I am part Italian, but I LOVE garlic. The scent of garlic cooking is a scent that will always make my mouth water. Except maybe dessert, although I have heard there is garlic ice cream, I can’t think of a dish that isn’t made better with garlic.  There is a Garlic Festival in Gilroy, CA, and pretty sure it is on my bucket list. Needless to say I love garlic, thankfully I live with someone who loves garlic as much as I do, so there is no awkward garlic breath moments.

My name is Ryan, and I am addicted to garlic…

One of my favorite things to make with garlic is my Roasted Garlic Tomato Sauce, which is my go to anytime I need a pasta sauce. This sauce is super simple to make and can be made with just a few ingredients. Once you know how to make your own pasta sauce there is no reason to buy jarred sauce.  If you have a can of tomatoes, some aromatics (onions, garlic, etc.), some herbs (dried are fine), oil, and an hour to spare you can make a pasta sauce that will almost always rival a jar of pasta sauce you can buy at the grocery store.

The great thing about homemade sauce is that it is mostly hands-off prep time, add your ingredients to a pot, stir every 15 or 20 minutes and let time work it’s magic. Added bonus, tomato sauce freezes wonderfully, so next time canned tomatoes are on sale you can stock up!  This is one of these recipes where canned items are actually superior to fresh. Fresh tomatoes are delicious, but without a food mill or the patience to blanch, seed, and crush fresh tomatoes, it can be a pain to make pasta sauce. When using canned tomatoes make sure you taste, because some tomatoes can have a “tinny” taste that can make your sauce taste acidic. If you have an acidic sauce add 1 teaspoon of sugar and cook for another 5 or 10 minutes; you don’t want the sauce to taste sweet, you are just trying to take the “tang” out of the sauce.

Roasted Garlic Tomato Sauce

Makes About 1 Quart of Sauce

Ingredients

  • 8 – 10 cloves garlic, minced or ran through a garlic press
  • 1/4 to 1/3 cup olive oil
  • 1/2 tablespoon kosher salt
  • 1 28 oz. can whole plum tomatoes or pureed tomatoes (if you want a smoother sauce)
  • 1 14.5 oz can diced tomatoes
  • 2 teaspoons italian seasoning
  • 1 teaspoon white sugar (optional, taste to see if the sauce is too acidic)
  • 1 tablespoon balsamic vinegar (optional, but I HIGHLY recommend this, it is my secret ingredient to adding depth to the sauce)
  • salt and pepper to taste

1. Add your minced or pressed garlic to a saucepan with the olive oil (smaller the better) over LOW heat; do not burn the garlic, it will get bitter. You want the oil to slightly cover the garlic.

2. Stir in your salt and slowly poach the garlic in the oil for 30 minutes. Keep an eye on the garlic and make sure it doesn’t get too brown.

3. After the garlic is done, add the canned tomatoes to a dutch oven, pasta pot or a deep skillet over medium-low heat. Add the garlic and garlic-infused oil to the tomatoes and stir to combine. Cook for about 5 minutes, then add the italian seasoning.

Canned tomatoes before adding the garlic and garlic oil.

4. Cook over medium-low heat for 25-30 minutes and taste, adding sugar if needed.  Cook for another 5-10 minutes. Add the balsamic vinegar and let cook for another 10 minutes or so. The balsamic beautifully rounds out the sauce. As long as the sauce remains over low heat, you can keep cooking it until it gets to the taste and thickness you desire, adding salt and pepper to taste.  The sauce is incredible over pasta, ravioli, sandwiches or frozen for storage.

Sauce after about 45 minutes of cooking. Stir to incorporate the garlic oil.

Roasted Garlic Sauce over Homemade Wonton Pea Ravioli

Demystifying Risotto

Risotto

If you have ever watched a “reality” cooking show like Hell’s Kitchen or MasterChef you would think that risotto is some impossible dish that is associated with fancy restaurants and takes hours over a hot stove while some chef is yelling in your ear.  In reality, risotto is one of the most popular ways to cook rice in Italy and is something most Italian home cooks can make in their sleep. Knowing how to make risotto is a great thing to have in your toolbox, as it is easy, endlessly flexible and never fails to elicit oohs and ahhs from your dinner companions.

Risotto has gained a reputation recently of being expensive, fussy and time consuming. Once you have all of your ingredients in place you can have a satisfying plate of risotto on the table in less than 30 minutes, and usually closer to 20 minutes. The key to risotto is making sure everything is ready to go before adding anything to the pan. Risotto requires a fair amount of attention and stirring, and you won’t have time to chop veggies, grate cheese, etc. once you start this process.

You should think of risotto as more of a technique instead of a static recipe. Once you understand the technique, you can add mushrooms, vegetables, proteins (such as shrimp, italian sausage, tempeh) and have a whole roster of dishes at your fingertips. The basic blueprint for risotto is (1) saute up aromatics (onion, garlic, herbs) in fat (butter, olive oil), (2) add the rice to the pan and stir, coating the grains in the oil, lightly toasting the rice, (3) slowly adding warm broth to the rice and stirring, and (4) add your mix-ins.

Basic Risotto

4 – 6 Servings

Ingredients

  • 1 small onion, finely diced
  • 2-4 cloves garlic, minced
  • 2 cups of arborio rice (sometimes simply labeled as risotto rice)
  • 1/2 cup white wine (as long as it isn’t a sweet white like moscato or a dessert wine; I used risling)
  • 6 cups stock, warmed over low heat (vegetable, chicken, seafood; aim for something fairly light, not a heavy beef stock)
  • 2-3 tablespoons of butter
  • salt and pepper to taste
  • 1 cup cheese (parmesan is the classic here)

1. Make sure everything is chopped and your stock is being warmed in a medium saucepan over low heat

2. Heat a high-sided pan with a large bottom (10-inch skillet, dutch oven, etc.) over medium heat. Melt the butter and add the onion to the pan. Sauté for 3-5 minutes until the onion softens and turns translucent. Add garlic and any other seasonings (italian seasoning), along with salt and pepper and cook for another minute until fragrant.

3. Add your rice to the onion and garlic mix, stir until the grains are nice and coated with the butter. Add more if needed, the grains need a nice coating. Stir until the ends are translucent and the middle is still opaque. The rice should have a nice toasty scent.

Nicely coated and toasty rice

4. Add the wine to pan, stirring and deglazing the pan. Simmer and stir until the wine is reduced and the pan is dry.

5. Add the warm broth to the rice, one ladle at a time. Stirring until the rice has absorbed the broth, then adding another ladle. Don’t rush this step as this slow adding of the broth is what cooks the rice and releases the starch in the rice. This starch creates the nice creamy texture that risotto is loved for.  Begin to taste your rice after about 15 minutes, the rice should have a bit of a chew and a thick creamy consistency. Traditionally the consistency is described as “all’onda”, wavy or flowing in waves.

6. As a final step, add and gently stir in an additional ladle of broth, the cheese and your cooked mix-ins. If you want to add some additional richness, feel free to add another tablespoon of butter. Serve immediately.

                    Don’t rush and flood your rice with broth

When the broth is mostly absorbed add another ladle

Take your time and you will be rewarded with this wonderful creaminess!
Summertime in a Sauce… Otherwise Known as Chimichurri Sauce

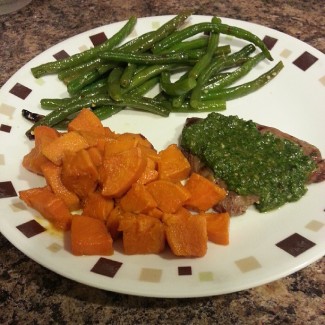
ImageChimichurri sauce, an Argentinean sauce similar to pesto, is traditionally served with grilled meats. I paired my chimichurri sauce with grilled steak, grilled green beans, and roasted sweet potatoes, but the sauce would be divine on vegetarian-friendly options such as grilled tempeh. The brightness of the herbs combined with the acidity of red wine vinegar make this a perfect sauce for summer. This version as inspired Ted Allen’s, host of Food Network’s Chopped, new cookbook, In My Kitchen, adds some heat with the addition of roasted jalapeño peppers. The great thing about chimichurri sauce is that it is such a simple and cheap sauce that will make everyone think you are a gourmet chef!

Roasted Jalapeño Chimichurri Sauce

Ingredients

  • 2 jalapeño peppers
  • 1 medium bunch cilantro, finely chopped (leaves and stems)
  • 1 medium bunch parsley, finely chopped (leaves and stems)
  • 3 garlic cloves, minced
  • 3 tablespoons lime juice (fresh or bottled juice works fine here)
  • 2 1/2 tablespoons dry red wine (I used pinot noir)
  • 1 tablespoon red wine vinegar
  • 1/2 cup olive oil
  • 1 1/2 teaspoons of kosher salt
  • 1/2 teaspoon of ground black pepper
  1. Preheat your broiler to high and place you oven rack approximately 3 inches from the broiler.
  2. Place the peppers on a sheet pan and roast under the broiler for 7-10 minutes, turning several times until the skin is blistered and blackened.
  3. Remove the pan carefully from the oven and place the peppers in a paper bag or covered bowl to steam and cool. Once cool enough to handle, peel the skin, chop off the stem and cut the peppers in half lengthwise to remove the seeds.
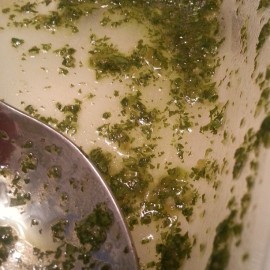
  4. Place the peppers, cilantro, parsley, minced garlic, lime juice, wine, vinegar, olive oil, salt and pepper to a blender and pulse to blend. Taste for salt, add more if needed and pulse again to combine.
  5. Cover and refrigerate for at least an hour to allow the flavors to meld. The sauce is good for up to a week in the refrigerator, but will begin to lose some of its brightness in both color and flavor. Plus to be honest, I am willing to bet this sauce won’t last longer than about 2 days!

972000_10100507940500600_354158933_nThanks to my wonderful girlfriend for this picture.

A New Adventure, A Random Idea

“Love People. Cook them tasty food.” – Penzeys Spices

This quote lives on my refrigerator and every time I start to cook I see it and it reminds me why I love to cook. I am just a guy who loves to cook and loves to see my food bringing happiness to others.

This blog is being started as a way for myself to document what I cook and sometimes what I eat. It is a way to be more thoughtful about what I cook and what I eat and to share my food with those people in my life who can’t be here in person to eat it. I have no grand plan that this will be a world famous blog, I just want a way to share my culinary adventures with my friends and family. I expect this blog will mostly be about what I cook with random posts about other food topics.

So why call myself The Hungry Flexitarian? The flexitarian is a reflection of what I eat. Most of my diet and the recipes I cook are vegetarian and sometimes even vegan, but every once in a while I may include either seafood or meat dishes. The hungry part of the title refers both to my physical love of food and also my never-ending desire to learn more about food.

Finally, I am a big believer that good food doesn’t have to be expensive or complicated. With some smart shopping and a knowledge of what foods are in season, you can cook delicious food that doesn’t break the bank.

So let’s go! Here’s to new adventure and hopefully tasty food!